At the end of this week it'll be Halloween & I've decided to create two different crafty posts to share with you. The first one will be this alternative pumpkin one & the second will be a nail post, it'll be up in a couple of days hopefully. I'm going to fit it inbetween work, house work & chilling.
Last year I thought it might been a fun idea to carve a pumpkin, I'd never done it growing up so I wanted to see what all the fuss was about. It is safe to say I wont be rushing to carve another pumpkin again, the smell & the feel....yuck!
Last year I thought it might been a fun idea to carve a pumpkin, I'd never done it growing up so I wanted to see what all the fuss was about. It is safe to say I wont be rushing to carve another pumpkin again, the smell & the feel....yuck!
This year I've done things a little different. I decided to transform my pumpkin...

I'm not going to pretend it was all my idea, it wasn't. I got inspiration from both Louise from Sprinkle of Glitter & Lauren Conrad. After watching Louise's video 'Halloween Toddler Crafts' & seeing the glitter pumpkin, also really liking the Halloween night light...great job as always Louise! :)
Then I spotted this on my instagram feed...
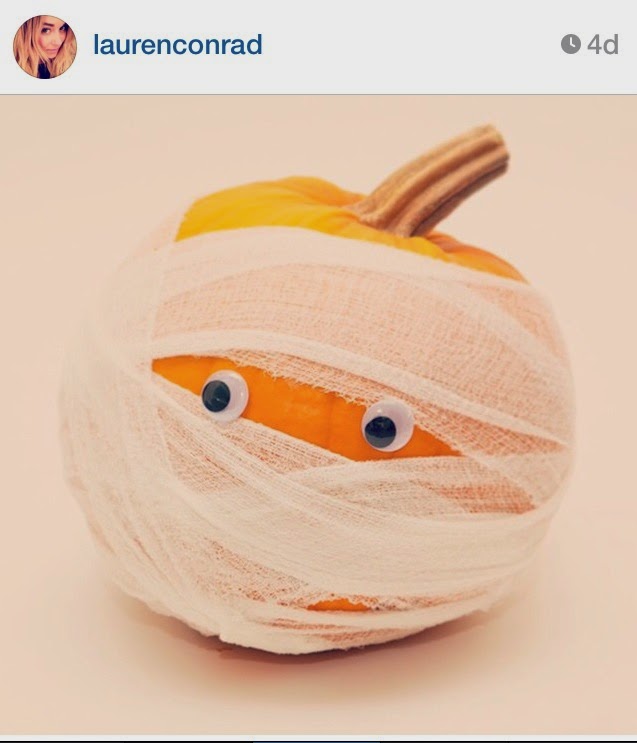
Add the two inspirations together & I created my little glittery pumpkin mummy with googly eyes! It's so simple to create so I thought I would share it with you...

You will need:
- a pumpkin
- a bin bag
- glue
- glue spreader
- masking tape
- glitter
- googly eyes
- bandages
- a few safety pins (only could find one at the start when I took the photo)
Firstly let's cover our work surface with the bin bag, the glitter can be pretty messy & using a bin bag will save time afterwards cleaning. Plonk your pumpkin in the middle & get ready for the next part.

Using your masking tape (or whoevers masking tape it is if you've just used someone elses...I used my mums & got moaned at afterwards, oooopppss! It was apparently her best masking tape, who knew?! She couldn't stay mad looking at the cuteness of the finished thing!) Create any size rectangular shape you like really, it's going to be mainly covered by the bandages anyway.

I made it fairly large so I could cover some of the edges with the bandage & still know I'd be able to have enough of the face showing. Next thing to do is add the glue & the glitter, this is when the glue spreader comes in handy...nobody wants messy fingers!

I used the masking tape to prop the pumpkin up so I could spread the glitter without it falling straight off, this was clearly the point that got the masking tape covered in glitter...sorry mum!
Next thing to do is wait around 10 minutes, for the glue to dry a little bit & then peel off the masking tape. Now you should be left with something like this...

Oooppsss, the glue was still running a little bit...don't worry if that happens, it's going to get covered anyway. Get your bandages & start covering your pumpkin (one bandage at a time) however you like, there is no right or wrong way...you just do it however you want. I made sure I went around the whole pumpkin though, to cover the base too. Once you've done safety pin your bandage in place. I only ended up using two safety pins for the whole thing (one pin for each bandage).

Once you've covered your pumpkin, turned it into a mummy & are pleased with it, it's time to glue on your googly eyes. I decided to go for two different sizes, you can do whatever you like. Now you're glittery pumpkin mummy with googly eyes is complete!

Choose somewhere to proudly display your pumpkin & wait for the compliments to roll in (hopefully!) Oh, don't forget to gather your bin bag together & throw it away too! TA DA, easy peasy cleaning! There should be no mess what so ever. :)

I hope you've enjoyed this little crafty post, I really do love creating them. Have you ever tried something different instead of carving your pumpkin? Let me know, I'd love to hear about your ideas & creations too!
♥
I hope you've enjoyed this little crafty post, I really do love creating them. Have you ever tried something different instead of carving your pumpkin? Let me know, I'd love to hear about your ideas & creations too!
♥


.jpg)


No comments